Showing posts with label crafts. Show all posts

Tuesday, May 20, 2014

lacquer box d.i.y.


now that my master bathroom is all done and fly looking, seriously, you should stop by and hang out in there coz it's pretty freakin awesome, i have a little project planned for that bathroom.
it involves slices of agate and a whole lotta UPS waiting time so while i sit and wait for these agates to arrive....

we had this one blue agate coaster and it just felt lonely.
it's so pretty but it spent most of it's days in an old fish tank out in the garage. the poor little 25 cent carnival fish had long ago floated to the top of the tank and now it sort of rested in this sad graveyard with other colorful pebbles and shells.

the blue is the wrong color for my bathroom project (coming up soon, i think. damn UPS!!) but i wanted to do something with it.

i decided to use it and make a decorative box. i've been adding more and more blue to my family room and thought it would probably work best there but right now i'm floating it around to see where i like it best.


if you don't have an old box around that you can use or paint then you can hit up michael's.
michael's has a pretty large selection and i found mine for maybe $5 or $6-use a coupon and you will really be cool.

i didn't like the clasp on the box because it felt too office like. i removed it, filled in the tiny holes with putty and sanded it.

i sprayed the box with a few coats of glossy white spray paint and let dry.

once all dry, i used a few tiny dots of gorilla glue in just a few places around the very edge of the agate then placed it on the lid. i'm sure there are better, and faster, options than gorilla glue since gorilla glue needs to sit for some hours but i wasn't sure what would work best with agate. this worked really well so i will be using it on my bathroom project coming up for sure.


i absolutely love how it turned out. the pictures really don't do it any justice.
now i really can't wait to get that bathroom project done!

p.s. if you work for UPS or have any inside info can you ask where kendra's dang agate slices are? it's taking forrrrrrrrever!

check back for my master bath reveal, it's gonna be soon. i think.


follow me via BLOGLOVIN!!
follow me on TWITTER!!
follow me on INSTAGRAM!!
follow me on GOOGLE+!!

That DIY Party link party at diyshowoff.com


http://sandandsisal.com/2014/05/inspire-me-monday-linky-party-8.html

Tuesday, December 24, 2013

wrapped and ready


i've been a bit quiet lately, december seems to do that to a person. 
tons to do. 
cookies to make (and eat), cards to send (kids wouldn't sit on santas lap so a plan b is in the works which make my cards new years cards), sons of anarchy episodes to catch up on (oh, hey jax), and ya know, the gifts, the wrapping and all that other glitter dusted december business.


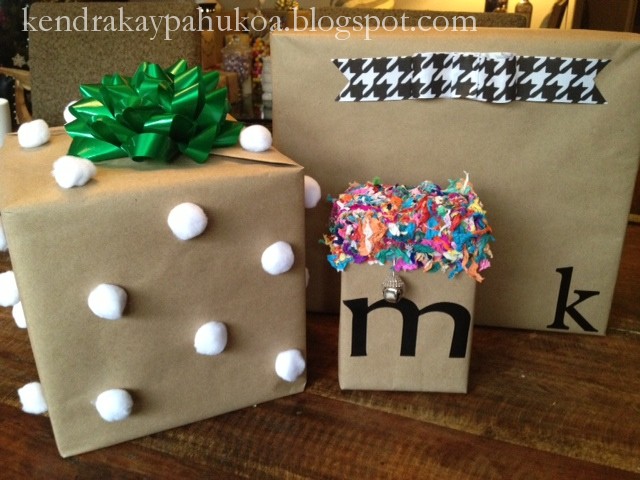
i thought i would share some of my favorite gifts i wrapped for the littles from last year. so ya know, if you are in the thick of paper and bows, feathers and curling ribbon here are a few ideas for ya. 

you have exactly 17 hours left. 
ready? go!


i hope you all have a fabulous christmas eve and christmas day or whatever it is you celebrate!!


Monday, December 24, 2012

wrappin it up!

can you believe it's here? it's finally time? my kids have asked EVERY DAY since december 1st if they could unwrap a gift. every dang day.
partially this is my fault and partially it's that hawaiians fault.

the hawaiian man cannot (cannot!) wait when he has a gift or a secret. he must tell. he must hint and he must let you open early. so, you see, the kids know this weakness and work it. every single day starting from december 1st.

i start wrapping as early as possible. 
it's amazing how 3 sets of little eyes can "happen" upon the areas of nestled gifts a'hiding but cannot find darn near anything else on a daily basis without yelling, "moooooooom", at the top of their lungs for help 3 rooms away!
so, i start early and then they see the boxes and little imaginations start to swell and soon the begging begins. 
oh, this year, they started in on the whole, "well, ya know the world is gonna end so if we wait then all your shopping and pretty wrapping will be for nothin'!" 

see, really it's both our faults.

this year i decided that i would not fizzle out on the gift wrapping. i would make every gift pretty. oh the begging that has ensued simply because of my feathers, bells, glitter and confetti! just for the record, it doesn't get any less annoying whether the gift is wrapped in beautiful paper and bows or snot. well, i didn't really wrap any gifts in snot, that was maybe a bad analogy. 

anyway, here are some of my fav's. 


i hope you all have a fabulous christmas eve and christmas day or whatever it is you celebrate!!


Monday, July 9, 2012

succulent wall garden UPDATE!

warning: this project may give you a huge head


i feel like a serious real life big girl right now.
hey y'all, like look what i can do- oh just make succulent boxes and keep them alive and stuff.
ya know, its not like i didn't believe in myself but i really just didn't believe in myself.


i felt like they were so pretty and almost too easy to create that i figured eventually they would either die or just never sprout and it would be a major bust.  however, my thumb is obviously boomin' green (that's a serious green, vibrantly green- crayola has no clue what this green is-its that green!) oh, and i'm totally bragging because look at my wall garden!


so about a week or so after i made my first succulent garden boxes our garden gal liz came by to check on other things happenin' in our yard. liz had just made her own garden box and was checking mine out. mine were chillin on their tables in the sun with about 5-7 more weeks until their wall debut.
well, this moment is what i imagine it would be like for a singer to stand in front of simon cowell and belt a tune. ok, well, maybe not as life changing as that, i do have a flair for dramatics. anyway, hang with me, this is going somewhere.....

ok, so back to holding my breath waiting for liz to tell me why my boxes wouldn't work and how they were wrong and how i was really kinda lame and should stick to my day job and get myself outta the garden. it was a very hurtful scenario where i would feel like a huge loser and i would run from my garden sobbing.
but, (always a but with me) liz kinda spent a minute picking around in my succulents, pulling off pieces and then she said, "this is really good kendra, you did it perfectly, this should be beautiful and ready to hang in about 6-8 weeks.......unless......" liz started to look at the chicken coop wiring and started picking around again. yes, yes liz, unless what???? is this where she says, "haaaaa, kidding, this sucks- dump it!" no. liz started to explain how i could hang this thing up tomorrow if i wanted to. liz is rad. period.

apparently all i had to do is go on down to jo-ann's fabrics and buy this box of greening pins and push one through the center of each succulent! i mean, i was spearing them and they still refused to give up life on me-we are bonded forever now.


lastly, you take some moss, weave it through the chicken wire being sure to get the moss around the base of each succulent (mostly the moss is so the dirt doesn't fall through the wire when you hang it as the pups will not have rooted yet) then hang it up on your wall and go on with life as if you are not an amazing bad ass garden girl. this last part is hard to do coz you feel rather special for a bit of time. you just have to kinda act normal. its a process.


anyway, just a few secrets for you instant gratification people like myself. i hope you try it, i hope you feel awesome about yourself and i hope you enjoy your succulent boxes all year long. now i must go and stare at my creation......

Tuesday, June 12, 2012

hanging succulent garden


a few weeks ago i decided i was gonna give a wall garden a try. i had been viewing them in hotels, magazines and reading all kinds of diy's on them.

 i have been a lover of succulents for quite sometime and last year i had a whole bunch of them planted in my front and back yard. recently we had another yard overhaul and had a professional service come in and do all kinds of pretty work which included yep! more succulents!

i had planned for this project to take all day and to get all kinds of dirty, surprisingly it only took about 1/2 the day but not surprisingly i did get really really dirty.

here is what you need:

-1"x4" pieces of wood. these will be your box.
-wood screws to ensure your box will be strong enough
-plywood or alder for back of the box
-outdoor varathane that is water resistantchicken wire,
-chicken wire
-cactus soil
-molding. this can be whatever size you'd like and will be the pretty around the box edge.
-lots of succulent pups


1"x4" wood strips

here is what i love about shane.
i told him how i was gonna try to make these boxes and he built the frames for me ahead of time. this may of been because he didnt want to see me with a nail gun in hand.
hmmm.....he's such a bro.


here is the box with the back on. i made a large box and a smaller box. 
they are about 24"x30" and 16"x20". 
i also have another larger frame built which i will work on soon so i have a nice display large enough to fill the side of my garage wall over my fountain.


remember when i said that if you didn't have a hawaiian you should go out and get one? i stand by that.


use regular nails and wood screws as well. if you want to paint your box now is the time to do so and you will coat it with varathane once the paint is dry.


i chose to leave my garden box looking natural. 
after your box is made and the back is attached you will spray it with the varathane. be sure and get all the corners, sides and the back. you will want to do 2-4 coats of this to keep the wood from rotting over time.


because the boxes have to lay flat for 4-10 weeks (or until they take root) we decided to make a few at one time. i did buy some succulents but you can also trim pups off any of your existing succulents and just let them dry for a day or two so the end will callus over. you just want to leave (in the very least) 1/4" stem to bury into the soil.

succulent pups drying out on a plate


be careful for friendly cute yard animals that think you brought them treats.


once your varathane is dry (about 30 min. to 1 hour) you can fill the box with your soil


next you will stretch the chicken wire over the box and staple it on. cut the excess wire off.


add your decorative trim molding.
look how baddass i am with that staple gun!


now is the fun part. 
designing! 
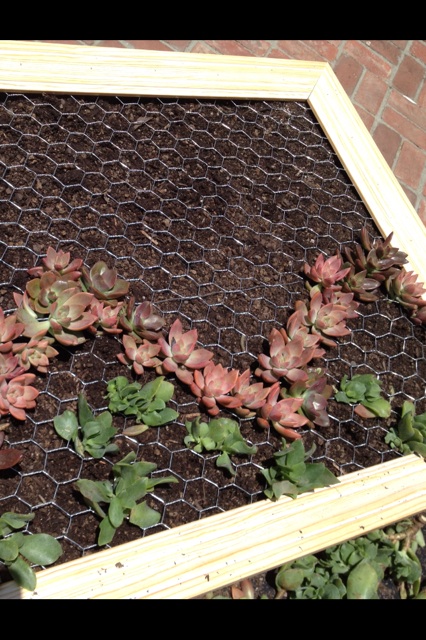
i decided to run a zig zag through the larger of my boxes with the pinkish succulents. you will want to leave some room for the succulents to grow and spread so don't fill every wire opening.


finished large box


finished smaller box.
now is the really hard part.
waiting for them to take root so you can hang up your garden and enjoy.
while they are laying flat you will want to water the boxes every 7-10 days. 
we are going to hang our boxes on the wall with hooks to make it easier to take down and water. after you take them down to water be sure and leave them flat for a few days to firm back up before hanging again.

once my succulent boxes are ready to hang i will update you and post some pictures- i can't wait!